
Creating HTML Tables with CSS
When you’re designing websites, landing pages, and even blogs, creating a table is usually discussed. Of course, tables communicate even the most complicated information better than standard text.
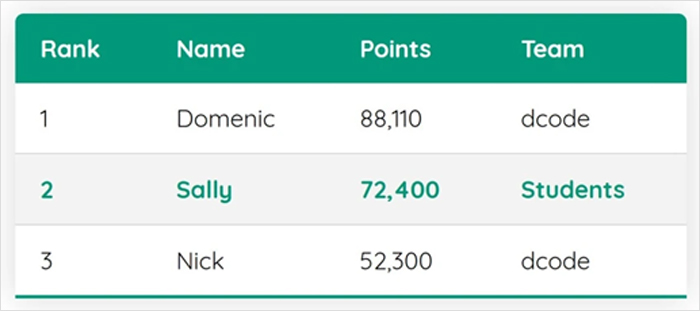
However, if you have to create multiple HTML tables on a web page, you could be searching for a simpler alternative. Fortunately, it’s completely simple to build a HTML table using CSS like this:
Below, you’ll learn how to create HTML tables with CSS and save a lot of time in the process.
Step #1: Writing the HTML
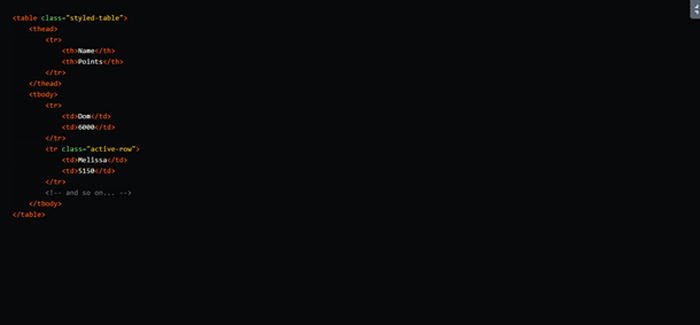
The first step in creating the table is writing the boilerplate HTML elements code. Ultimately, your code should look something like this:
In this code, there are two classes you should consider:
- The first class is represented as .styled-table. This designation is important to make sure you don’t alter every single table on your website.
- The second class is represented as .active-row. This class will become what is known as an “active” row. This designation will be applied to showcase a particular row, which will own its own CSS table later in the tutorial.
Step #2: Styling the Table
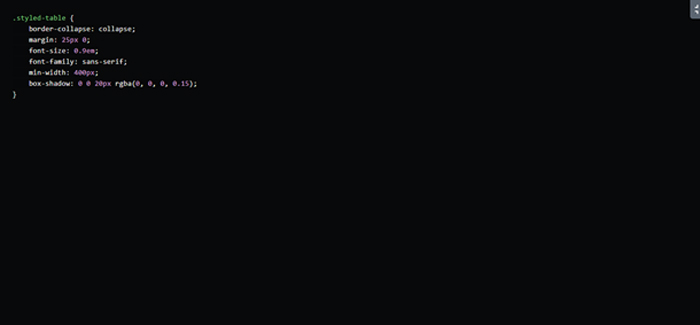
Now that the HTML code has been written, it’s time to style the table:
The table elements above are pretty simple to understand, but here is some clarification anyway:
- Box shadow is a simple element that adds a transparent shadow around the table borders of the table.
- Collapse table borders are another simple element that ensures that there are no spaces between the table cell borders.
Step #3: Styling the Table Header
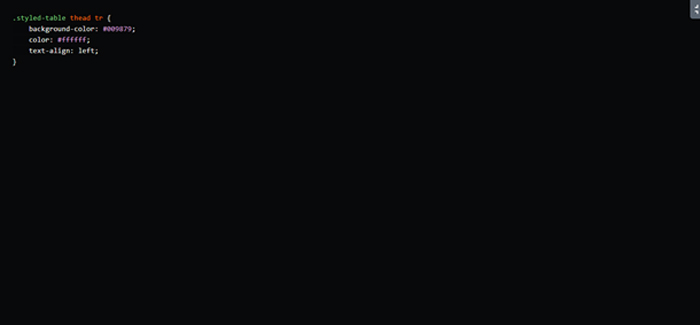
For this table to work, you’ll need to style the table headers in addition to the actual table. Below is what the code will look like if you apply basic styles to your HTML structure table:
That’s it for this step — let’s move on to modifying the table cells.
Step #4: Modify the Table Cells

No one wants to view a cluttered table of data or a table that has uneven table cells. That’s why it’s important to space out your cells, and it can be done using the following code:
Step #5: Alter the Table Rows
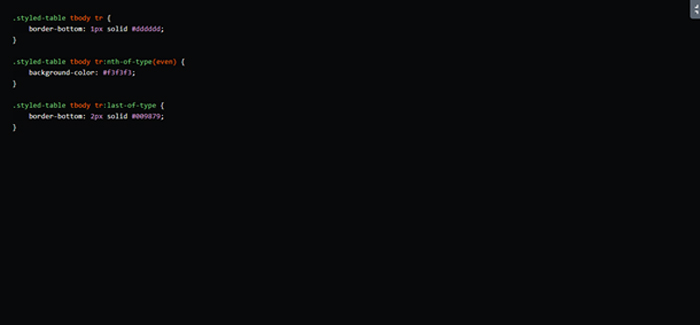
The next phase in creating HTML tables with CSS is altering the table row to fit the overall style of the scheme. To accomplish this, you’ll want to achieve three goals:
- Add a bottom border property to each row for separation purposes.
- Add a lighter background color to each second row for readability purposes.
- Add a darker background color to the last row to let readers know when the table has ended.
Here’s what the code would look like:
Step #6: Style the Active Row
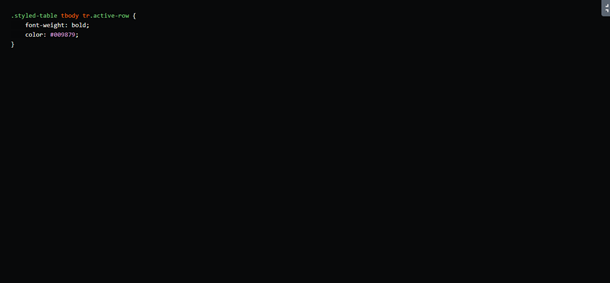
Finally, to complete the HTML table, you’ll need to make a few stylistic changes to the active row. This will also serve to aid readability for your website visitors:
Delegate to a Qualified Website Developer
Even with these simple steps, creating HTML tables with CSS can take a lot of time and hard work if you’re not an experienced programmer. If you’d still like to revamp the appearance of your website with these tables, we can help.
Contact us today to speak to a member of our team about our website development services.